Build a fixture
Purpose
FASTSUITE Edition 2 has a dedicated workbench to easily build a plate based fixture to support the workpiece.
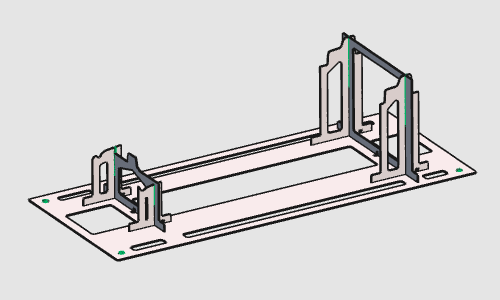
The initial fixture is directly derived from the workpiece. It is completed with modifications of individual plates and, if needed, by changing the number of support plates. After creation, fixture plates are nested onto a sheet and exported for 2D laser manufacturing.
Steps
1. Preparation
1.1 Open the workpiece file (if needed)
If the workpiece document has not been loaded into the session, open B_Pillar.cenwpc from the training data folder. If the workpiece is already open, this step can be skipped.
Open file
1.2 Switch to the Fixture Builder workbench
Switch to FB workbench

2. Build the fixture
2.1 Build the global fixture
Build the fixture
The fixture will be modified to meet the design intention.
Several different enhancement commands are available, of which some will be highlighted here in the next steps.
3. Modify the base plate
3.1 Change the base plate height position
Change the position of the fixture base plate by dragging the Z axis of the manipulator, then run Update to recompute the fixture.
Update base plate height
3.2 Change the base plate size
Change the size of the fixture base plate. After clicking in 3D space, the base plate is recomputed.
Resize base plate
3.3 Change the base mounting hole size
Select the four mounting holes in the base plate and change their diameter. After clicking in 3D space, the holes are recomputed.
Resize mounting holes
4. Modify the support plates
4.1 Move a support plate
Change the position of a fixture support plate. The fixture updates immediately after moving the support plate.
Move support plate
4.2 Re-size a support plate
Place the mouse over the foot of a support plate and start the resize command. Move the manipulator axis to modify the plate.
Resize support plate
4.3 Split a support plate
Place the manipulator at the support plate and start the Split command. The plate is split into two plates that can be modified individually.
Split support plate
4.4 Add a support plate
Place the manipulator at the target position where a new support plate should be added.
Add support plate
4.5 Remove a support plate
Remove support plate
The design of the supports plates (and base plate) is managed over several different attributes. These attributes can be modified to change the global design.
4.6 Edit fixture parameters
Open the Fixture parameter dashboard and modify plate design attributes. Multiple parameters can be edited before recomputing the fixture.
Edit fixture parameters
5. Save the fixture
5.1 Save the fixture
Save the fixture under an appropriate name.
Save fixture
Next Step
-> Set up the laser cutting project