Build the water jet cleaner
Purpose
Use the Resource Builder workbench to build the water jet cleaning device and prepare it for manufacturing projects.
The cleaner geometry is imported from an external file and converted into a tool resource. The resource is completed with device properties and specific frames so it can be attached to a robot and simulated reliably.
Steps
1. Preparation
1.1 Switch to the Resource Builder workbench
Switch to RB workbench

1.2 Create a new empty document (if needed)
If another document is already open in the running session, create a new empty document. If no document is open, this step can be skipped.
Create a new document
Open the File menu and select New. If prompted, choose whether to save the currently open document, close it without saving, or cancel.
2. Define the tool resource
2.1 Import geometry from Water_Jet_Cleaner.step
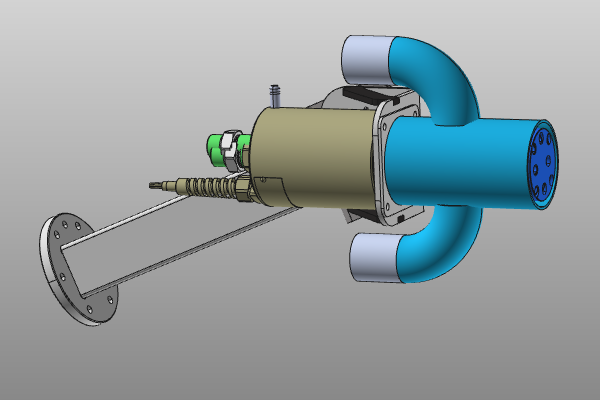
Import the geometry from Water_Jet_Cleaner.step in the training data.
Import geometry
2.2 Create a tool resource for the cleaner
Create a tool resource
3. Build the cleaning device shape
3.1 Attach the imported geometry
Attach geometry
4. Define cleaner device properties
4.1 Set cleaner properties
Give the device an appropriate name and set required properties.
Set device properties
5. Create specific frames
5.1 Filter display to technology frame
Use the technology frame to define the location of the water jet spray cone.
Filter display
5.2 Move frame to nozzle center
Move frame
5.3 Align axis and set final frame position
Align the normal axis to the nozzle plate and move the frame 100 mm inward to its final position.
Align and position frame
5.4 Create tool center point frame
Create a tool center point frame 140 mm above the technology frame.
Create TCP frame
6. Save the cleaner device
6.1 Save the completed cleaning device
Save the resource
Next Step
-> Set up the water jet project